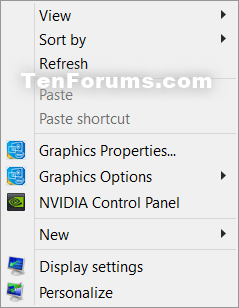
If you have Intel HD graphics drivers installed, then this tutorial will show you how to add or remove the IntelGraphics Properties and Graphics Options desktop context menu items for all users in Vista, Windows 7, Windows 8, and Windows 10.
You must be signed in as an administrator to be able to add or remove the Intel HD Graphics context menu items.
You must be signed in as an administrator to be able to add or remove the Intel HD Graphics context menu items.
EXAMPLE: Intel HD Graphics context menu items

Here's How:
1. Do step 2 or step 3 below for what you would like to do.
2. To Add Intel HD Graphics Control Panel to Desktop Context Menu
NOTE: This is the default setting.
A) Click/tap on the Download button below to download the file below, and go to step 4 below.
Add_Intel_Graphics_Control_Panel_to_desktop_context_menu.reg

3. To Remove Intel HD Graphics Control Panel from Desktop Context Menu
A) Click/tap on the Download button below to download the file below, and go to step 4 below.
Remove_Intel_Graphics_Control_Panel_from_desktop_context_menu.reg

4. Save the .reg file to your desktop.
5. Double click/tap on the downloaded .reg file to merge it.
6. If prompted, click on Run, Yes (UAC - Windows 7/8/10) or Continue (UAC - Vista), Yes, and OK to approve the merge.
7. You can now delete the downloaded .reg file if you like.


No comments:
Post a Comment